Blog
Find out container process user id
Published: 2024-08-12
NB users with the same id on host and inside container share privileges on the host machine.
docker top <CONTAINER> -eo uid,gid,pid,cmd
this command will show a custom format output of the process list, starting with the uid
Deployment scenario: NextJs Static site, separate content repo
Published: 2024-06-12
This scenario describes a static site being built from two separate repositories, one containing a NextJS based source and a second content repository containing media files, text and necessary configuration / glue files.
A common use case is a static site being rebuilt based on content added through a repository interface like github or gitlab. this is a simpler equivalent to a full blown cms. like so the future content editor only needs to be trained to interface with a common and widely used and supported system.
Infrastructure parts
- client repository site
- client repository content
- mirror repository site
- mirror repository content
- ci system
- container registry
- web server
Deployment pipeline
App updates
- commit is pushed to client app repo
- client app repo is pushed to mirror app repo
- ci executes pipeline on mirror app repo
- clones app code from mirror
- clones content from mirror
- builds container image with web server
- copy files into container
- builds site and merges content
- configures webserver
- pushes image to registry
- triggers deploy on infrastructure
- pulls container image
- restarts service
Content updates
- commit is pushed to client content repo
- client content repo is pushed to mirror content repo
- ci executes pipeline on mirror content repo
- clones mirror app repo
- updates version file with commit hash (stage) or tag (prod) from content repo
- commits change and pushes to client app repo, thereby triggering a run of the App Update pipeline above
Configuration files
- ci pipeline .woodpecker.yml on the site repo
- example deploys the built artefact to a caprover-managed server and notifies via a telegram bot
steps:
  clone_content_repo:
    image: ubuntu
    secrets: [ssh_pubkey_with_read_access]
    commands:
      - apt-get update -y && apt-get install openssh-client git git-lfs -y
      - eval $(ssh-agent -s)
      - echo "$ssh_pubkey_with_read_access" | tr -d '\r' | ssh-add -
      - mkdir -p ~/.ssh
      - chmod 700 ~/.ssh
      - ssh-keyscan -p9235 git_server > ~/.ssh/known_hosts
      - env
      - git clone --depth=1 ssh://git@git_server/${CI_REPO}-content content
      - cd content
      - git lfs pull
      - rm -rf .git
      - cd ..
      - rm -rf .git
    when:
      - event: push
        branch: [master, main]
      - event: tag

  build_stage_image:
    image: woodpeckerci/plugin-docker-buildx
    settings:
      registry: package_server
      repo: git_server/${CI_REPO}
      tag: ${CI_COMMIT_SHA}
      username: wellhoster
      password:
        from_secret: gitea_pass
    when:
      - event: push
        branch: [master, main]
        status: success

  build_prod_image:
    image: woodpeckerci/plugin-docker-buildx
    settings:
      registry: package_server
      repo: git_server/${CI_REPO}
      tag: ${CI_COMMIT_TAG}
      username: wellhoster
      password:
        from_secret: gitea_pass
    when:
      - event: tag
        branch: [master, main]
        status: success

  deploy_prod_site:
    image: caprover/cli-caprover:v2.1.1
    environment:
      - CAPROVER_URL=https://caprover_domain
      - CAPROVER_APP=appname
      - "CONTAINER_FULL_IMAGE_NAME_WITH_TAG=package_server/${CI_REPO}:${CI_COMMIT_TAG}"
    secrets: [ caprover_pass ]
    commands:
      - caprover deploy --caproverUrl $CAPROVER_URL --caproverPassword $CAPROVER_PASS --caproverApp $CAPROVER_APP --imageName $CONTAINER_FULL_IMAGE_NAME_WITH_TAG
    when:
      - event: tag
        status: success

  deploy_stage_site:
    image: caprover/cli-caprover:v2.1.1
    environment:
      - CAPROVER_URL=https://caprover_domain
      - CAPROVER_APP=appname
      - "CONTAINER_FULL_IMAGE_NAME_WITH_TAG=package_server/${CI_REPO}:${CI_COMMIT_SHA}"
    secrets: [ caprover_pass ]
    commands:
      - caprover deploy --caproverUrl $CAPROVER_URL --caproverPassword $CAPROVER_PASS --caproverApp $CAPROVER_APP --imageName $CONTAINER_FULL_IMAGE_NAME_WITH_TAG
    when:
      - event: push
        branch: [master, main]
        status: success

  notify:
    image: appleboy/drone-telegram
    settings:
      token:
        from_secret: telegram_token
      to: 393273328
      message: >

          ✅ Building `${CI_REPO_NAME}` triggered by `${CI_PIPELINE_EVENT}`


            This went to prod.


          📝 Commit by ${CI_COMMIT_AUTHOR} on `${CI_COMMIT_BRANCH}`:

          `${CI_COMMIT_MESSAGE}`

          ❌ Build ${CI_PIPELINE_EVENT} of `${CI_REPO_NAME}` has status `${CI_PIPELINE_STATUS}`.


            This tried to go to prod.


          📝 Commit by ${CI_COMMIT_AUTHOR} on `${CI_COMMIT_BRANCH}`:

          `${CI_COMMIT_MESSAGE}`

    when:
      event:
        - tag
        - push
      status:
        - success
        - failure
Use Jekyll with Tailwind and PostCSS
Published: 2024-06-11
This is a reminder for future me.
add PostCSS
group :jekyll_plugins do
  gem "jekyll-postcss"
end
edit _config.yml
plugins:
  - jekyll-postcss

postcss:
  cache: false
NB Disabling cache is needed for Tailwind CSS’s JIT engine.
create a postcss.config.js
module.exports = {
  plugins: [
    require('tailwindcss'),
    require('autoprefixer'),
    ...(process.env.JEKYLL_ENV == 'production'
      ? [require('cssnano')({ preset: 'default' })]
      : [])
  ]
}
NB Autoprefixer and cssnano packages are optional, but they are recommended for production builds.
install packages
yarn add postcss@latest tailwindcss@latest autoprefixer@latest cssnano@latest -D
create a tailwind.config.js
module.exports = {
  content: [
    './_drafts/**/*.html',
    './_includes/**/*.html',
    './_layouts/**/*.html',
    './_posts/*.md',
    './*.md',
    './*.html',
  ],
  theme: {
    theme: {
      extend: {},
    },
  },
  plugins: []
}
NB If you add new directories for your posts, pages, or partials, you will need to update the content array
install tailwind typography for better default display
yarn add@tailwindcss/typography
KDE Plasma 6: Turn off display from Shell
Published: 2024-05-23
Turn off displays from shell in kde plasma 6 under wayland
sleep 0.5 && qdbus org.kde.kglobalaccel /component/org_kde_powerdevil invokeShortcut "Turn Off Screen"
Custom error pages for Caprover
Published: 2024-04-19
Currently one can customize catch-all pages for caprover’s root domain under these values:
error_page 404 /index.html;
error_page 500 502 503 504 /error_generic_catch_all.html;
by overriding the configuration parameter “nginxDefaultHtmlDir’, setting this in the generated nginx config:
root /usr/share/nginx/default;
from the template
root <%-captain.defaultHtmlDir%>;
Because caprover has this default bind mount for the nginx container, this works:
{
        "Type": "bind",
        "Source": "/captain/generated/static",
        "Destination": "/usr/share/nginx",
        "Mode": "",
        "RW": true,
        "Propagation": "rprivate"
}
By setting “nginxDefaultHtmlDir” to /usr/share/nginx/default, one is able to create a persistable directory “default” under “/captain/generated/static” and reference it like mentioned above.
However, for the application-specific server block, the template looks like this:
error_page 502 /captain_502_custom_error_page.html;

location = /captain_502_custom_error_page.html {
        root <%-s.customErrorPagesDirectory%>;
        internal;
}
Currently, this writes out to
error_page 502 /captain_502_custom_error_page.html;

location = /captain_502_custom_error_page.html {
        root /usr/share/nginx/default;
        internal;
}
It’s defined here, a combination of “nginxStaticRootDir” + “nginxDefaultHtmlDir”
Kamal: What Else Would You Need?
Published: 2024-03-19
Since its initial release, Kamal (formerly mrsk) has emerged as the long-awaited facelift to Capistrano, while also making the us of Docker seem like a walk in the park. At its heart, Kamal taps into Docker, steering us away from the oftentimes bewildering saga of Ruby on Rails deployment. It transitions us from wrangling a mishmash of infrastructures—spanning development, testing, staging, to production across varied machines and operating systems with their own quirks in versions and package management—to the blissfully straightforward narrative of deploying with a single, neatly packaged container image.
At first glance, tools like Kamal are akin to a silver bullet for the solo developer, allowing for a breezy journey from code to production. This is crucial because it means you can focus on what truly matters: crafting solutions to business challenges with your code.
Post-deployment, the ‘state’ saga begins, ranging from the health of the operating system and network to the dynamics of application data.
However, what often goes unmentioned, similar to discussions about cloud computing: it’s all still running on someone else’s hardware. Beneath the surface, there lurks the ever-present need for handling ‘state, state, state’. And state is what comes after the deploy: starting from the state of the operating system, the network state, all the way up to the state of the application data.
So, after you deploy and then redeploy, it’s time to ponder over your next moves:
- How do I maintain and update the operating system and essential services?
- How can I monitor the current state of the operating system, services, and my application?
- What strategies should I use for managing data storage, whether in short-term storage like Redis or long-term solutions like PostgreSQL and file systems?
- How do I manage state stored in third-party applications, and apply the above considerations to them?
Server Options
When choosing a server, you would probably go for a virtual unmanaged instance from popular provider. They’re budget-friendly, and even the smaller offerings can comfortably support an app, a worker, a Redis instance, and a PostgreSQL instance. At the time of writing, Hetzner’s CX11, at 4.55 Euros, will fit the bill nicely. For a tad more, at 5.22 Euros, you get a boost with an extra thread and double the storage. Over at Digital Ocean, a comparable setup will cost you about 18 USD per month. AWS, with its notoriously cryptic pricing, offers something similar at a ballpark cost. Linode’s in the mix too, with options that might set you back somewhere between 12 to 24 USD.
What do you mean, unmanaged?
Mind you, all of these units are unmanaged, which means all responsibility lies with you as the contract partner to the hosting service. A server left to its own devices can quickly turn into a digital wasteland. Public-facing services are like open invitations for anyone with mischief in mind. Once compromised, it’s essential hot garbage. Best to scrap the server and start fresh.
Even if it’s “just a side project” or “not a top priority,” vigilance is non-negotiable. So, here are some high-level tips on how I keep things under control.
Tackling State
To keep the operating system and essential services in tip-top shape, I use Ansible playbooks, categorizing them by setup, service roles, and specific configurations for my setups — often CapRover on Docker Swarm or vanilla Ubuntu Server.
I organize tasks around the server’s life cycle—think “system upgrades,” “Docker cleanup,” “backup preparations,” “user and SSH key updates,” and so on.
For business processes, programmatic runbooks provide a blend of manual steps, scripts, and API requests (i.e. dns providers, git management, etc.), allowing for scalable and efficient project management. Their greatest strength lies in blending various layers of complexity: Beginning with a straightforward, step-by-step to-do list, you can incrementally incorporate external command calls or integrate comprehensive scripts to streamline and automate processes.
Gaining Insights
Gaining insight into the performance of your operating system, services, and applications is a crucial maintenance activity. There’s no one-size-fits-all solution; it’s all about the scope of your project and your personal preferences.
For a comprehensive overview at various levels, starting with an application monitoring tool like Honeybadger is wise for tracking errors, uptime, and job performance. It’s an excellent first step. As you become more acquainted with your application, developing custom metrics endpoints for specific features can be a beneficial next move.
Diving deeper, the management of services and the operating system necessitates centralized, indexed logging capable of generating actionable metrics. For a solo host, beginning with journald to capture all system logs is a practical choice. Given the diversity of the Linux logging landscape, setting this up can be complex. Selecting software or services that offer more than basic stdout or logfile outputs is crucial, though integrating such logs with journald can add complexity. The ability to live-tail journald, viewing all log outputs in real-time, greatly aids in understanding how different services interact on a server. For environments beyond a single host, integrating tools like Promtail, Loki, and Grafana can address journald’s limitations, especially for developing alerting rules based on incident experiences to improve oversight.
Monitoring the actual health of your host is also vital. Hosting providers may not alert you to issues like maxed-out threads, choked I/O, or full disks. Tools like Netdata as a starter, and the trifecta of Node Exporter, Prometheus, and Alertmanager later on are invaluable for these deeper diagnostics. When selecting tools or third-party services, consider the type of data access they provide and the flexibility for configuring custom metrics and alerts.
Backup Strategies
Many hosting providers offer daily snapshots of your system as part of their service, often costing you 10-20% of your monthly server fees. Generally, this seems adequate until a snapshot coincides with a crucial database transaction or file write, potentially leading to data inconsistencies or corruption. The process for creating snapshots isn’t always transparent, and the common advice to shut down your server for a manual snapshot highlights its limitations.
My approach prioritizes data over the operating system’s state, focusing on database content and important application files — like media or client products — which are irreplaceable and costly to recreate. For everything else, tools like Ansible can rebuild the system from scratch.
Restic in conjunction with Autorestic is my preferred backup solution. It supports a wide range of storage backends and secures backups with encryption, offering differential backups and the option for full backups at specific intervals. The downside is its recovery process, which requires navigating through Restic, but the trade-off for secure, manageable backups is worth it. Adhering to the 3-2-1 backup strategy — three total backups on two different media types, with one stored offsite — provides a robust safety net. Thus, combining provider snapshots with Restic backups across various platforms, like B2 Backblaze and Hetzner storage boxes, ensures comprehensive coverage. While daily backups are standard, timing them to capture the day’s significant work can further safeguard your data.
Conclusion
Managing an application’s lifecycle is a complex task that can’t be fully covered in just one article. I plan to dive deeper into the topics discussed here, sharing more of my experiences and insights. This will allow me to explore these concepts in a more practical, detailed manner, moving beyond theoretical discussions to real-world applications.
Therefore, feel free to leverage Kamal for streamlining your deployment process, but remember, deployment is just one phase in the broader journey of an application’s life.
References
Hosting Providers
Management Tools
Insights Tools
Backup Tools
Ansible: Display variables and depend on changed
Published: 2024-03-13
Show run time variable values for host
- name: display all variables and facts known for a host
  ansible.builtin.debug:
    var: hostvars[inventory_hostname]
Correct way of registering change on shelled out commands
- name: Handle shell output with return code
  ansible.builtin.command: cat
  register: my_output # <- Registers the command output.
  changed_when: my_output.rc != 0
conditional when changed
- name: create systemd unit file
  ansible.builtin.template:
  dest: /path/to/foo
  src: foo.j2
  register: unit_file

- name: reload systemd daemon when unit file changed
  ansible.builtin.systemd:
  daemon_reload: true
  when: unit_file.changed
Install digidoc client on arch linux
Published: 2023-12-13
Assuming some client for AUR
Install packages
yay -S qdigidoc4 ccid pcsclite web-eid-firefoxservices
sudo systemctl start pcscd.service && sudo systemctl enable pcscd.service
Maybe there’s an alternative to web-eid-firefox, but only after installing it, the error ‘PKCS#11 cannot be loaded’ in digidoc4client disappeared
Test it under https://web-eid.eu
Jinja2 indentation and other layout problems
Published: 2023-11-28
If you don’t want your indentation get messed up for example in a docker-compose file, add this to the very first line.
#jinja2: lstrip_blocks: "true", trim_blocks: "false"
It will prevent any simple or nested if/for statements to interfere with the layout.
Docker Hub images domain
Published: 2023-11-18
The domain for a docker image is docker.io.
When there’s no organization/user, it seems /library is added.
So the Ubuntu image fqdn is docker.io/library/ubuntu
Reset arch linux key ring
Published: 2023-11-16
If you have problems with some pubkey not present, use this blunt method:
mv /etc/pacman.d/gnupg /etc/pacman.d/gnupg.bkp
pacman-key --init
pacman-key --wpopulate
Fixing LinkedIn link preview
Published: 2023-11-14
One client mentioned that previews of their articles do not work. Turns out that LinkedIn has their own debugging tool for such purpose: https://www.linkedin.com/post-inspector
It presented a 400 error that related to an nginx error: 414 Request-URI Too Large
The solution was to expand the relevant buffers:
large_client_header_buffers 4 3k;
That was enough to solve it for this particular case.
Facebook has a similar tool: https://developers.facebook.com/tools/debug/
Search Github for content in particular file type
Published: 2023-11-13
On github, one can search content in a particular kind of file, in this case woodpecker ci definition files:
github_ _search path:/(^|\/)\.woodpecker\.yml$/ build_args
Postgresql Changes Grant All To Public
Published: 2023-11-13
postgresql
https://www.cybertec-postgresql.com/en/error-permission-denied-schema-public/
change in psql 15
besides creating the database, role and granting privileges, one now has to also grant all on schema public of same database:
create database "example";
create user "example" login protected with password 'password';
grant all on database 'example' to example;
grant all on schema 'public.example' to example;
update fuel php to 1.9 dev
Published: 2023-10-02
This is a bit niche, but I have one client app where that was needed.
Update fuel php to 1.9 dev
- Copy
composer.jsonfrom githube repo into the project’s root directory update
composerby running:curl -s https://getcomposer.org/installer | phpchownto local userrun
composeragainst newcomposer.json:php composer.phar update --prefer-dist php composer.phar install --prefer-distmake sure file ownership is proper
chown -R user:group folder
Copy text in yakuake tmux fishshell
Published: 2023-09-18
Took a while, but i found it… shift + lmb click and drag over the text, then ctrl + shift + c to copy to desktop environment clipboard. d’oh
Loop to echo out container stats to a file
Published: 2023-09-17
This was helpful to get an initial impression of the resource requirements of a couple of running containers before migration to a new infrastructure environment.
for i in {1..2880}; do
    echo "------ $(date) ------" >> docker_stats_CONTAINER_NAME.txt;
    docker stats $(docker ps --format '{{.Names}}' | grep 'CONTAINER_NAME') --no-stream >> docker_stats_CONTAINER_NAME.txt;
    sleep 300;
done
Percona
Published: 2023-05-17
We were running Percona MySQL version 8 and since some time a bunch of deprecation warnings have been popping up during the service start.
'Disabling symbolic links using --skip-symbolic-links (or equivalent) is the default. Consider not using this option as it' is deprecated and will be removed in a future release.
'NO_ZERO_DATE', 'NO_ZERO_IN_DATE' and 'ERROR_FOR_DIVISION_BY_ZERO' sql modes should be used with strict mode. They will be merged with strict mode in a future release.
'default_authentication_plugin' is deprecated and will be removed in a future release. Please use authentication_policy instead.
Deprecated configuration parameters innodb_log_file_size and/or innodb_log_files_in_group have been used to compute innodb_redo_log_capacity=104857600. Please use innodb_redo_log_capacity instead.
These concern the following config entries:
replaced:
innodb_log_file_size = 50M
with
innodb_redo_log_capacity = 52428800
replaced:
default-authentication-plugin=mysql_native_password
with
authentication_policy = 'mysql_native_password'
removed:
symbolic-links=0
expanded: `sql_mode = NO_ENGINE_SUBSTITUTION,STRICT_ALL_TABLES
to
sql_mode = NO_ENGINE_SUBSTITUTION,STRICT_ALL_TABLES,NO_ZERO_DATE,NO_ZERO_IN_DATE,ERROR_FOR_DIVISION_BY_ZERO
Also you can (i think since some time version 8) bind the mysql daemon to multiple interfaces, so now i’m letting it listen to localhost and the private network address to access the db in an easier way than through ssh tunneling, i.e.:
bind-address = 127.0.0.1,10.1.2.3
Synchronizing a list of checked and unchecked items
Published: 2023-04-27
Example showing a list of available premium_licenses, and have the ones checkmarked that are chosen, as well as update the chosen set with newly checked and unchecked items.
class Client::SiteController < Client::ApplicationController
after_action :notify_admin
def update
  @site = Site.find params[:id]
  update_site_premium_licenses
end

private

def update_site_premium_licenses
  ids_before = @site.bulk_premium_license_ids
  @site.bulk_premium_license_ids = site_params[:bulk_premium_license_ids].select { |x| x.to_i > 0 }
  ids_after = @site.bulk_premium_license_ids
  @licenses_added = ids_after - ids_before
  @licenses_removed = ids_before - ids_after
  @site.save
  !@site.errors.present?
end

def notify_admin
  AdminNotification.with(remove: @licenses_removed, add: @licenses_added, site: @site).deliver(email_address)
end

def site_params
  params.require(:site).permit(bulk_premium_license_ids: [])
end
The view is a collection of check-boxes and a submit button. CSS classes reference Bulma.
<%= form_with model: [:client, site] do |form| %>
  <div class="field has-check">
    <div class="field">
      <p><%= t("subscriptionsDir.licenses.explainer") %></p>
    </div>
    <div class="field">
      <div class="control">
        <%= collection_check_boxes(:site, :bulk_premium_license_ids, BulkPremiumLicense.all, :id, :title) do |b| %>
          <%= b.label(class: "b-checkbox checkbox", for: nil) do %>
          <%=   b.check_box(checked: site.bulk_premium_license_ids.include?(b.object.id)) %>
          <%=   tag.span class: "check is-primary" %>
          <%=   tag.span b.object.title, class: "control-label" %>
          <%  end %>
          <%= tag.br %>
        <% end %>
      </div>
    </div>
    <div class="field">
      <div class="control">
        <%= form.submit t("subscriptionsDir.licenses.submit"), class: "button is-primary" %>
      </div>
    </div>
  </div>
<% end %>
Notifications are being sent via noticed gem.
Change Mysql Database Name
Published: 2023-04-21
The easiest way to change database name is to copy to old stuff into the new stuff via a dump:
mysqldump source_db | mysql destination_db
Add an admin to a wordpress database
Published: 2023-04-03
Because it comes up so often:
INSERT INTO `wordpressdatabase`.`wp_users` (`ID`, `user_login`, `user_pass`, `user_nicename`, `user_email`, `user_status`, `display_name`) VALUES ('1000', 'username', MD5('password'), 'username', 'contact@example.com', '0', 'username');

INSERT INTO ` wordpressdatabase`.`wp_usermeta` (`umeta_id`, `user_id`, `meta_key`, `meta_value`) VALUES (NULL, '5', 'wp_capabilities', 'a:1:{s:13:"administrator";b:1;}');

INSERT INTO ` wordpressdatabase`.`wp_usermeta` (`umeta_id`, `user_id`, `meta_key`, `meta_value`) VALUES (NULL, '1000', 'wp_user_level', '10');
Scope of Plausible selfhosted api key generator
Published: 2023-04-01
Plausible selfhosted api key generator in the UI only generates a key with scope of stats:read:* but if you want to call any provisioning endpoints you need the scope of sites:provision:*
easiest way is to generate a key, connect to the database, and change the scopes field in the api_keys table to the needed scope.
Here’s the related github discussion
Quickes way to prepare Windows Terminal WinRM for Ansible
Published: 2023-02-02
Controlling windows terminals with Ansible needs an initial configuration step on the terminal that activates WinRM, enables https transport, and creates a self-signed certificate. In this way one can manage small scale fleets that are not part of an ActiveDirectory Domain.
The most reduced procedure involves these two files:
A batch file that one can easily call with “Run as administrator…”. It calls this well known powershell script and makes some of its configuration options explicit.
Here is a copy, in case the repository goes away at some point in the future (archived version Version 1.9 - 2018-09-21)
The batch file expects the script file to be in the same directory.
Batch file content:
powershell -ExecutionPolicy ByPass -File %~dp0\prep_ansible.ps1 -Verbose -CertValidityDays 3650 -ForceNewSSLCert -SkipNetworkProfileCheck
Call Actionmailer from Rake Task
Published: 2023-01-31
If you call ActionMailer from a rake task, you can’t use ActiveJob, as the thread pool is killed once the rake tasks finishes. So everything is real time, which is not a problem at all, given it’s a rake task.
Redirect
Published: 2023-01-22
One way to redirect inside the Rails router based on the client’s Accept-Language header.
Previously I thought I had to do this inside the proxy webserver Nginx, only really possible with the LUA-enhanced fork of Openresty, or the selfcompiled Nginx version.
Or to go into the rack middleware world and figure out how to do it there - it’s probably still the fastest, cleanest to do it there.
There are more ways above that: routes file, and of course application controller.
I went for the routes file and added this directive:
root to: redirect { |params, request|

"/#{best_locale_from_request!(request)}"

}, status: 302, as: :redirected_root
The curly braces syntax is obligatory, do/end block does not work.
The actual work is being done with the help of the accept_language gem and these two methods, split up for easier reading i presume:
def best_locale_from_request(request)
	return I18n.default_locale unless request.headers.key?("HTTP_ACCEPT_LANGUAGE")
	string = request.headers.fetch("HTTP_ACCEPT_LANGUAGE")
	locale = AcceptLanguage.parse(string).match(*I18n.available_locales)

	# If the server cannot serve any matching language,
	# it can theoretically send back a 406 (Not Acceptable) error code.
	# But, for a better user experience, this is rarely done and more
	# common way is to ignore the Accept-Language header in this case.

	return I18n.default_locale if locale.nil?
	locale
end
I’ve put them both into the routes file, but there might be a better place for that.
The available locales array grew a bit, in order to prevent edge cases:
# config/application.rb

config.i18n.available_locales = [:en, :"en-150", :"en-001", :"en-DE", :de, :"de-AT", :"de-CH", :"de-DE", :"de-BE", :"de-IT", :"de-LI", :"de-LU", :et, :"et-EE"]
Turns out the gem always forwards the geography part as well, so in order to make sure nobody is left out, I have added this for now. this might become tricky later on as paths are created based on that, and the language switcher might be a bit more tricky. maybe it makes sense to cut the second part off somehow.
Resources
Accept-Language gem: https://github.com/cyril/accept_language.rb
A rack app i did not get to work, but apparently does the i18n settings as well: https://github.com/blindsidenetworks/i18n-language-mapping
This was very helpful for the redirect syntax: https://www.paweldabrowski.com/articles/rails-routes-less-known-features
Moving lvm-thin volumes on proxmox between vm-s or ct-s
Published: 2021-11-05
Following this official howto
lvs shows you all volumes in their volume group (in my case ‘ssd’)
LV               VG  Attr       LSize    Pool        Data%  Meta%
data             pve twi-a-tz-- 32.12g               0.00   1.58
root             pve -wi-ao---- 16.75g
swap             pve -wi-ao---- 8.00g
guests           ssd twi-aotz-- <2.33t               74.93  45.51
vm-100-disk-0    ssd Vwi-a-tz-- 12.00g guests        72.69
vm-101-disk-0    ssd Vwi-a-tz-- 12.00g guests        85.22
vm-101-disk-1    ssd Vwi-a-tz-- 50.00g guests        99.95
vm-102-disk-0    ssd Vwi-a-tz-- 12.00g guests        97.57
vm-102-disk-1    ssd Vwi-a-tz-- 50.00g guests        64.54
vm-103-disk-0    ssd Vwi-a-tz-- 12.00g guests        74.37
vm-103-disk-1    ssd Vwi-a-tz-- 150.00g guests        52.42
vm-104-disk-0    ssd Vwi-a-tz-- 12.00g guests        90.74
vm-104-disk-1    ssd Vwi-a-tz-- 10.00g guests        95.27
vm-105-disk-0    ssd Vwi-a-tz-- 12.00g guests        55.79
vm-105-disk-1    ssd Vwi-a-tz-- 10.00g guests        32.89
vm-106-disk-0    ssd Vwi-a-tz-- 12.00g guests        77.78
vm-106-disk-1    ssd Vwi-a-tz-- 10.00g guests        99.82
vm-107-disk-0    ssd Vwi-a-tz-- 32.00g guests        0.00
vm-107-disk-1    ssd Vwi-a-tz-- 500.00g guests        95.41
vm-108-disk-0    ssd Vwi-aotz-- 8.00g guests        43.73
vm-109-disk-0    ssd Vwi-a-tz-- 12.00g guests        52.41
vm-109-disk-1    ssd Vwi-a-tz-- 50.00g guests        2.22
vm-110-disk-0    ssd Vwi-a-tz-- 12.00g guests        51.14
vm-110-disk-1    ssd Vwi-a-tz-- 50.00g guests        2.22
vm-111-disk-0    ssd Vwi-a-tz-- 12.00g guests        84.85
vm-111-disk-1    ssd Vwi-a-tz-- 100.00g guests        16.97
vm-112-disk-0    ssd Vwi-a-tz-- 8.00g guests        13.53
vm-113-disk-0    ssd Vwi-a-tz-- 8.00g guests        11.55
vm-114-disk-0    ssd Vwi-a-tz-- 16.00g guests        84.31
vm-115-disk-0    ssd Vwi-a-tz-- 16.00g guests        97.12
vm-116-disk-0    ssd Vwi-a-tz-- 8.00g guests        31.49
vm-117-cloudinit ssd Vwi-aotz-- 4.00m guests        50.00
vm-117-disk-0    ssd Vwi-aotz-- 10.00g guests        39.71
vm-117-disk-1    ssd Vwi-aotz-- 1000.00g guests        97.47
If the id of the new ct or vm is not equal to the id of the volume’s previous attachment, rename them, i.e.
lvrename ssd/vm-101-disk-1 ssd/vm-117-disk-2
this will make vm-101-disk-1 available as vm-117-disk-2, you have to increase the count in the end of the name.
then edit the config of the actual vm.
take the line from /etc/pve/qemu-server/<vm id>.conf that describes the volume to the new <vm id>.conf
the tricky thing was to run qm rescan afterwards which fixed syntax and made the volume appear in the web gui where i could finally attache it to the new vm.
WakeOnLan, Archlinux, systemd-networkd, Asus Pro WS X570-ACE
Published: 2021-06-03
The board has two integrated ethernet adapters, here’s the lshw data:
sudo lshw -c network
  \*-network
       description: Ethernet interface
       product: I211 Gigabit Network Connection
       vendor: Intel Corporation
       physical id: 0
       bus info: pci@0000:05:00.0
       logical name: enp5s0
       version: 03
       serial: 24:4b:fe:<redacted>
       size: 1Gbit/s
       capacity: 1Gbit/s
       width: 32 bits
       clock: 33MHz
       capabilities: pm msi msix pciexpress bus\_master cap\_list ethernet physical tp 10bt 10bt-fd 100bt 100bt-fd 1000bt-fd autonegotiation
       configuration: autonegotiation=on broadcast=yes driver=igb driverversion=5.12.8-zen1-1-zen duplex=full firmware=0. 6-1 ip=<redacted> latency=0 link=yes multicast=yes port=twisted pair speed=1Gbit/s
       resources: irq:61 memory:fc900000-fc91ffff ioport:e000(size=32) memory:fc920000-fc923fff
  \*-network
       description: Ethernet interface
       product: RTL8111/8168/8411 PCI Express Gigabit Ethernet Controller
       vendor: Realtek Semiconductor Co., Ltd.
       physical id: 0.1
       bus info: pci@0000:06:00.1
       logical name: enp6s0f1
       version: 1a
       serial: 24:4b:fe:<redacted>
       size: 1Gbit/s
       capacity: 1Gbit/s
       width: 64 bits
       clock: 33MHz
       capabilities: pm msi pciexpress msix bus\_master cap\_list ethernet physical tp mii 10bt 10bt-fd 100bt 100bt-fd 1000bt-fd autonegotiation
       configuration: autonegotiation=on broadcast=yes driver=r8169 driverversion=5.12.8-zen1-1-zen duplex=full firmware=rtl8168fp-3\_0.0.1 11/16/19 ip=<redacted> latency=0 link=yes multicast=yes port=twisted pair speed=1Gbit/s
       resources: irq:24 ioport:d800(size=256) memory:fc814000-fc814fff memory:fc808000-fc80bfff
It seems that the UEFI entry to activate Wake on Lan for PCIe devices only affects the Intel port, I have persistently activated WOL for the Realtek port by adding a .link file to /etc/systemd/network/foobar.link
[Match]
MACAddress=<redacted>

[Link]
WakeOnLan=magic
# below lines are cloned from original entry in
# /usr/lib/systemd/network/99-default.link
# which is the default link file for all adapters whose section is hereby overwritten
NamePolicy=keep kernel database onboard slot path
AlternativeNamesPolicy=database onboard slot path
MACAddressPolicy=persistent
The arch wiki shows a couple of alternative ways, but this seems to be the most straight forward for me.
Upgrade Postgresql from 11 upwards
Published: 2021-04-19
On Ubuntu 18.04
Be wary of multiple installations (11, 12, 13), as pg_upgradcluster for example will always go for the highest version.
- Copied configuration files for new version
cp -R /etc/posgresql/11 /etc/posgresql/12
- Initialized new version db
/usr/lib/postgresql/12/bin/initdb -D /srv/postgres/12/main
- Stopped the current server and killed all connections
/usr/lib/postgresql/11/bin/pg_ctl -D /srv/postgres/11/main/ -mf stop
- Ran checked upgrade with linked files
time /usr/lib/postgresql/12/bin/pg_upgrade --old-bindir /usr/lib/postgresql/11/bin/ --new-bindir /usr/lib/postgresql/12/bin/ --old-datadir /srv/postgres/11/main/ --new-datadir /srv/postgres/12/main/ --link --check
- Had to fix diverse configuration file problems that are obvious when running
/usr/lib/postgresql/11/bin/pg_ctl -w \
-l pg_upgrade_server.log \
-D /srv/postgres/11/main \
-o "-p 50432 -b  -c listen_addresses='' -c unix_socket_permissions=0700 -c unix_socket_directories='/var/lib/postgresql'" start
cat pg_upgrade_server.log
Those were mostly faulty references to configuration files, or having to explicitly state the non-standard data directory location.
Lastly, the systemd related things:
systemctl disable postgres@11-main
systemctl enable postgres@12-main
run openvpn in client mode automatically after linux boot
Published: 2021-01-15
scenario: send out a raspberry pi model b rev1, all setup with raspberryi os / raspbian.
the hardware specs are nothing much, but the machine is reliable, even when apparently half the ram chips are dead….
install openvpn, then take the config file from the server you want to connect to - in my case an ovpn file generated by pivpn - and put it into the config folder `/etc/openvpn/`. if your vpn profile is password protected, just add a simple textfile with the cleartext pass and reference it in your vpn profile file like so: askpass /etc/openvpn/passwordfilename
make sure openvpn.service is started and enabled. systemctl enable openvpn && systemctl restart openvpn
should be it, ip a should show you the tunnel interface already.
ps: for the routing, make sure that your that your router has a static entry that sends all the traffic to the vpn subnet to the vpn server, but that is something that depends really on your own net topology.
run openvpn in client mode automatically after linux boot
Published: 2021-01-15
Context: Remote raspberry pi model b rev1, all setup with raspberry os / raspbian.
the hardware specs are nothing much, but the machine is reliable, even when apparently half the ram chips are dead.
- Install openvpn from the distro’s repository
- Take the config file from the server you want to connect to - in my case an ovpn file generated by pivpn - and put it into the config folder
/etc/openvpn/. - if your vpn profile is password protected, add a textfile with the cleartext pass and reference it in your vpn profile file like so:
askpass /etc/openvpn/passwordfilename - make sure
openvpn.serviceis started and enabled.systemctl enable openvpn && systemctl restart openvpn
ip a should show you the tunnel interface already.
NB: for the routing, make sure that your that your router has a static entry that sends all the traffic to the vpn subnet to the vpn server, but that is something that depends really on your own net topology.
update gnubee debian jessie to buster, to bullseye
Published: 2019-12-28
Upgrade to stretch (Debian 9) and then buster (Debian 10)
To upgrade gnubee to stretch, put this in /etc/apt/sources.list:
deb http://httpredir.debian.org/debian stretch main
deb http://httpredir.debian.org/debian stretch-updates main
deb http://security.debian.org/ stretch/updates main
Then upgrade the packages:
apt update
apt full-upgrade
apt autoremove
reboot
To upgrade to buster, put this in /etc/apt/sources.list:
deb http://httpredir.debian.org/debian buster main
deb http://httpredir.debian.org/debian buster-updates main
deb http://security.debian.org/debian-security buster/updates main
and upgrade the packages:
apt update
apt full-upgrade
apt autoremove
reboot
Then to bullseye (Debian 11)
- Make sure the system is fully up to date
apt update
apt full-upgrade
apt autoremove
reboot
- Edit
/etc/apt/sources.list
- replace each instance of buster with bullseye
- find the security line, replace buster/updates with bullseye-security
- this is an example:
deb http://security.debian.org/ bullseye-security main contrib non-free
deb http://httpredir.debian.org/debian bullseye main contrib non-free
deb http://httpredir.debian.org/debian bullseye-updates main contrib non-free
- Again upgrade the system
apt update
apt full-upgrade
apt autoremove
reboot
instant domain name for ipv6 device
Published: 2019-12-22
You can use IPv6address.has-a.name as a domain name for any of your computers, containers or VMs. The required format is 1234-5678-9abc-def0-1234-5678-9abc-def0.has-a.name. This is already a valid name and points to the IPv6 address 1234:5678:9abc:def0:1234:5678:9abc:def0. Alternatively you can also use the domain has-aaaa.name, which implies IPv6 stronger.
Both domains support IPv6 abbreviation using dashes, you can f.i. use 2a0a-e5c0–3.has-aaaa.name.
Configure Ubuntu 18.04 with grub2 to activate serial console
Published: 2019-12-16
Edit the file /etc/default/grub
- Change GRUB terminal to console and ttyS0. This will provide one GRUB to a monitor display and serial console.
- Change linux kernel console to tty1 and ttyS0. This setting will be taken over to userland, and there will be two login prompt for tty1 and ttyS0.
GRUB_CMDLINE_LINUX="console=tty1 console=ttyS0,115200"
GRUB_TERMINAL="console serial"
GRUB_SERIAL_COMMAND="serial --speed=115200 --unit=0 --word=8 --parity=no --stop=1"
subtle changes in key format of key pairs generated with `ssh-keygen` on linux
Published: 2019-07-11
I just came across an unexpected ssh key subtlety you might want to consider while creating a drone ci deployment pipeline using drone’s ansible plugin.
Part of the pipeline includes deploying code to a remote host via ssh. I generated a new key pair with ssh-keygen. This created a key with openssh new format starting with:
-----BEGIN OPENSSH PRIVATE KEY-----
Apparently ansible does not like this format and on the “Gathering facts” step erred out with the message “Invalid key”. Googling that was not very successful, and I could not find that particular message in the ansible source, until i eventually found an unrelated closed issue on github which pointed me towards possible problems with key formats.
Eventually i generated a new key pair like so ssh-keygen -m PEM, the -m option setting the key format. The key then had the starting line
-----BEGIN RSA PRIVATE KEY-----
As far as i understand both keys are actually RSA keys, the latter’s PEM format being implied, whereas the former uses some new openssh format i was not previously aware of.
Earlier runs of ssh-keygen did produce keys in the PEM format and as i am running Archlinux with OpenSSH_8.0p1, OpenSSL 1.1.1c 28 May 2019
One of the rolling updates to my system probably brought along this unexpected change.
Hope that helps somebody.
subtle changes in key format of key pairs generated with `ssh-keygen` on linux
Published: 2019-07-11
I just came across an unexpected ssh key subtlety you might have to consider while creating a drone ci deployment pipeline using drone’s ansible plugin.
Part of the pipeline includes deploying code to a remote host via ssh. I generated a new key pair with ssh-keygen. This created a key with openssh new format starting with:
-----BEGIN OPENSSH PRIVATE KEY-----
Apparently ansible does not like this format and on the “Gathering facts” step erred out with the message “Invalid key”. Googling that was not very successful, and I could not find that particular message in the ansible source, until i eventually found an unrelated closed issue on github which pointed me towards possible problems with key formats.
Eventually i generated a new key pair like so ssh-keygen -m PEM, the -m option setting the key format. The key then had the starting line
-----BEGIN RSA PRIVATE KEY-----
As far as i understand both keys are actually RSA keys, the latter’s PEM format being implied, whereas the former uses some new openssh format i was not previously aware of.
Earlier runs of ssh-keygen did produce keys in the PEM format and as i am running Archlinux with OpenSSH_8.0p1, OpenSSL 1.1.1c 28 May 2019
One of the rolling updates to my system probably brought along this unexpected change.
Hope that helps somebody.
Compile Go on MIPS/MIPS32
Published: 2019-02-27
I’ve been trying to compile go programs on the gnubee which runs on the MIPS architecture.
Found this on github:
I have successfully cross compileed a go program into a mips32 binary with below command.
GOARCH=mips32 is for ar71xx, change to GOARCH=mips32le if it is ramips.
cd
git clone https://github.com/gomini/go-mips32.git
cd go-mips32/src
export GOOS=linux
export GOARCH=mips32
sudo mkdir /opt/mipsgo
./make.bash
cd ..
sudo cp -R * /opt/mipsgo
export GOROOT=/opt/mipsgo
export PATH=/opt/mipsgo/bin:$PATH
vi helloworld.go
go build helloworld.go
chroot and serial console to fix ubuntu distro upgrade gone wrong
Published: 2018-09-20
I had to fix a do-distro-upgrade from 16.04 to 18.04 due to a severed ssh connection, and no screen running (apparently earlier distro upgrades used screen to prevent this kind of problem)
The machine as a PCengine apu2, so no video. Also, the root file system is sitting on a miniPCI ssd.
Eventually, my laptop and this chroot cheatsheet helped: https://aaronbonner.io/post/21103731114/chroot-into-a-broken-linux-install
Mount the root filesystem device
mount -t ext4 /dev/<device> /mnt/If there’s a different boot partition or anything else
mount -t ext2 /dev/<device> /mnt/bootMount special devices
 mount -t proc none /mnt/proc
 mount -o bind /dev /mnt/dev
 mount -o bind /sys /mnt/sys
chroot
 chroot /mnt /bin/bash
 source /etc/profile
In order to help troubleshoot in the future, i followed this advice to get a systemd service unit for a constant shell on the serial port, but mine runs for some reason on S0: http://0pointer.de/blog/projects/serial-console.html
systemctl enable serial-getty@ttyS0.service
systemctl start serial-getty@ttyS0.service
It won’t help if systemd does not start, but otherwise it is online really early.
Installing Ubuntu per minimal image to PC engines APU2
Published: 2017-05-17
This is the company: PCengines
This is the device: APU2
nullmodem setup
using putty
Check which com port, mine was set to ‘com4’
Get a usb to serial converter, install drivers. Some of those converters seem to have timing problems, but i did not encounter that.
I once tried lowest baud rate 9600 and that produced some nice screen carnival, but nothing really legible.
prepping usb stick
Download usb prep tool ‘TinyCore USB Installer’ and run it against on usb, i’ve used an 8GB stick, make sure it’s not the slowest
To try out you can now boot into TINYCORE. So put this into the APU2’s usb port and boot up having the serial nullmodem cable connected and the putty session open. Finished boot is indicated by an audible beep. This is good to check the serial connection which you should have established parallel to that.
If you want to keep the option of booting into TINYCORE open, backup the syslinux.config fom the USB’s root directory, as this one will be overwritten by the package content we are now downloading.
Download special ubuntu package from pcengines, unpack and move the three files into the usb root folder / or :/ depending on your system.
Now plug in the usb into the apu2 and boot having the serial nullmodem cable connected and the putty session open. You will see the setup menu, similar to this screen shot:
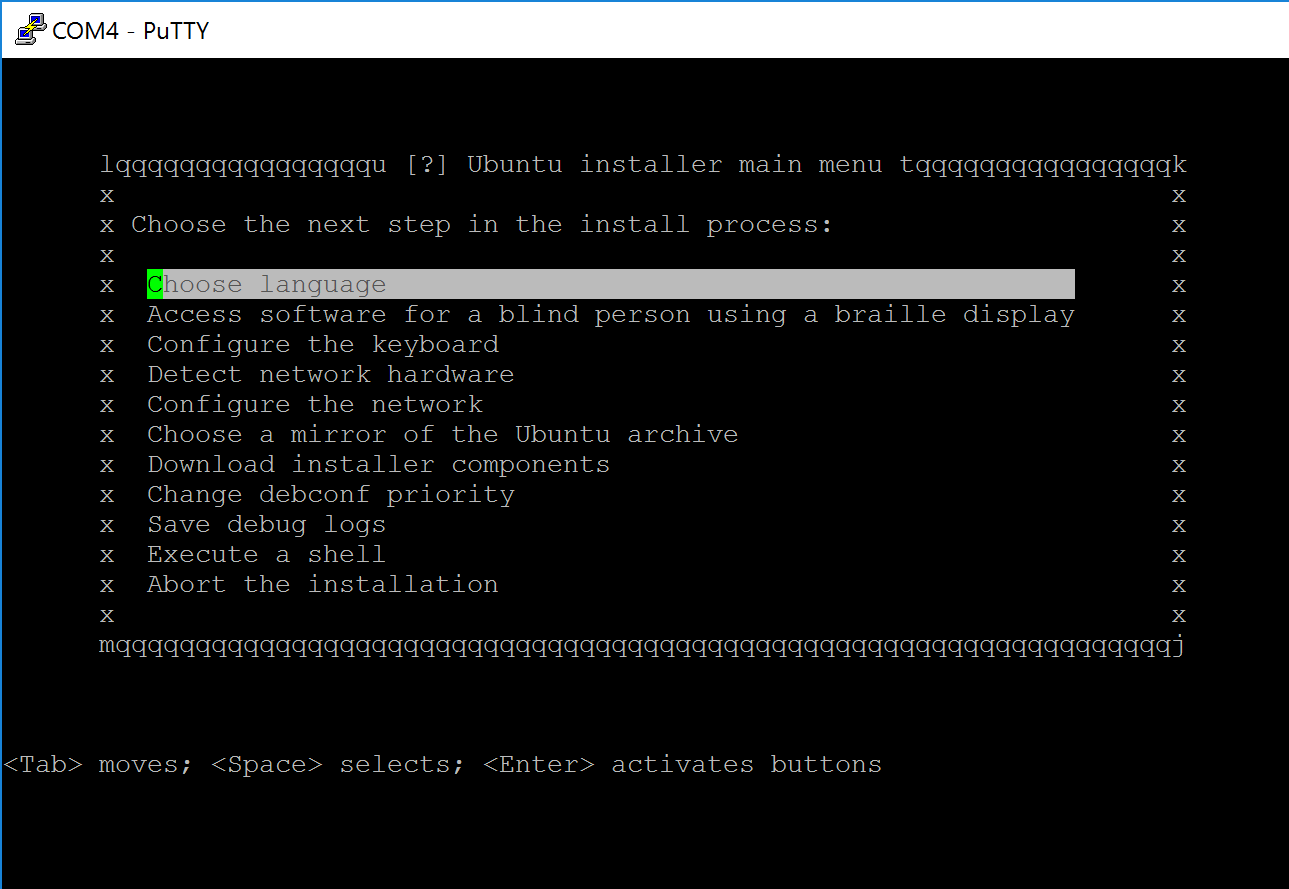
The terminal setup process seems daunting at first, but it essentially is really analogues to the graphical ubuntu installer. I found my way around by basically following the Easy Path(tm) of most of the suggestions of the installer, going automatically step by step through the menu. On some of the sub menus i was able to make some educated changes as i knew a bit of more details and i had a good idea where i want to go with this system, but this might not apply to you.
The one exception was the network configuration. running the automatic network detection seems to have got the dhcpd info , but when i dropped into the busy box ash shell environment (one menu option Execute a shell in the main hierarchy at the beginning of the installation process), i had to run dhclient directly on the interface again. Checking via ip addr i now could verify the indeed applied values, and could ping any public server. With exit i dropped back into the installation menu. On a later second setup run this problem did not occur again.
I chose no automatic updates as i can see the cronjob using quite some resources. I’d rather manually schedule that for this particular system at them moment. Part of the minimum running service policy of mine for this instance.
I followed some tip regarding the bootloader installation, and it apparently solved my problem of an unfinished installation before. I lost the link, but it boiled down to manually enter the first partition of the setup target (pcie flash device in my case), so that was /dev/sdb1 as opposed to /dev/sdb. Again, this might be different for you.
Once that was done, and with a bit more patience i rebooted and eventually login via ssh could be established. I then halted the machine, physically unplugged the usb key and the console, and replugged power.
After about 45 sec ping answered and after than ssh came back online.
Quick way to forward mails via postfix
Published: 2015-01-31
Assuming you’re running Postfix, first we make sure the virtual mappings file is enabled here /etc/postfix/virtual:
# Scroll down until you find virtual_alias_maps, make sure it reads something like
virtual_alias_maps = hash:/etc/postfix/virtual
# We also need to make sure the domain is enabled
virtual_alias_domains=example.com
Save and exit. Next we add the aliases to our mapping file /etc/postfix/virtual:
# Forward mail for admin@example.com to jo.bloggs@hotmail.com
admin@example.com  jo.bloggs@hotmail.com
If we want to send to two different addresses at once, we specify:
admin@example.com jo.bloggs@hotmail.com jos.wife@hotmail.com
Finally, we need to create a hash (later versions of Postfix don’t require this)
postmap /etc/postfix/virtual
It’s the same principle as passing mail into a local user’s mailbox.
How to create a self-signed (wildcard) certificate
Published: 2014-09-25
This is a quick step to generate a self-signed certificate:
openssl genrsa 2048 > host.key
openssl req -new -x509 -nodes -sha1 -days 3650 -key host.key > host.cert
#[enter *.domain.com for the Common Name]
openssl x509 -noout -fingerprint -text < host.cert > host.info
cat host.cert host.key > host.pem
chmod 400 host.key host.pem
source: http://blog.celogeek.com/201209/209/how-to-create-a-self-signed-wildcard-certificate/
Seafile 3 GUI client and Fedora 20
Published: 2014-04-30
Currently there is no official rpm package available for the GUI version of the Seafile 3 client. You can find extensive build instructions here:
Build and Use Seafile client from Source
I had to add the Vala package to the dependencies:
sudo yum install vala vala-compat wget gcc libevent-devel openssl-devel gtk2-devel libuuid-devel sqlite-devel jansson-devel intltool cmake qt-devel fuse-devel
Current versions:
Here’s a little fix up for the script parts:
#!/usr/bin/env bash

echo "Building and installing seafile client"

export version=3.0.2 # change this to your preferred version
alias wget='wget --content-disposition -nc'
wget https://github.com/haiwen/libsearpc/archive/v${version}.tar.gz
wget https://github.com/haiwen/ccnet/archive/v${version}.tar.gz
wget https://github.com/haiwen/seafile/archive/v${version}.tar.gz
wget https://github.com/haiwen/seafile-client/archive/v${version}.tar.gz
tar xf libsearpc-${version}.tar.gz
tar xf ccnet-${version}.tar.gz
tar xf seafile-${version}.tar.gz
tar xf seafile-client-${version}.tar.gz

export PREFIX=/usr
export PKG_CONFIG_PATH="$PREFIX/lib/pkgconfig:$PKG_CONFIG_PATH"
export PATH="$PREFIX/bin:$PATH"

echo "Building and installing libsearpc"

cd libsearpc-${version}
./autogen.sh
./configure --prefix=$PREFIX
make
sudo make install

cd ..

echo "Building and installing ccnet"

cd ccnet-${version}
./autogen.sh
./configure --prefix=$PREFIX
make
sudo make install

cd ..

echo "Building and installing seafile"

cd seafile-${version}/
./autogen.sh
./configure --prefix=$PREFIX --disable-gui
make
sudo make install

cd ..

echo "Building and installing seafile-client

cd seafile-client-${version}
cmake -DCMAKE_BUILD_TYPE=Release -DCMAKE_INSTALL_PREFIX=$PREFIX .
make
sudo make install
Run the lib linker, just in case sudo ldconfig
Start the client with seafile-applet
Skype and Fedora 20
Published: 2013-12-28
Thanks to Negativo17’s blog I got skype running. Here’s the step by step:
Run all commands as root or through sudo
- Add the the negativo17 repo of skype
wget http://negativo17.org/repos/fedora-skype.repo -O \ /etc/yum.repos.d/fedora-skype.repo
- Install skype normally via yum
yum install skype
NB: It considers the sound bug in Fedora 20:
On Fedora 20+, the real Skype binary is used through a wrapper that sets PULSE_LATENCY_MSEC=30 before running the real binary. As of Skype 4.2.0.11 this is required for proper operation.
NB: Always consider the trust implications of 3rd-party repo providers.
Keepass2 and Fedora 20
Published: 2013-12-28
You need to install the mono environment and use the portable version of keepass: sudo yum -y install mono-core mono-winforms
I have yet to figure out how to make a convenient link to the Gnome menu structure.
Estonian ID card and Fedora 20
Published: 2013-12-28
Additionally to the standard packages which you would install like so from the standard repository of Fedora:
sudo yum install qesteidutil qdigidoc mozilla-esteid
you should also install the pcscd package:
sudo yum install pcsc-lite
Finally, some useful tool here:
sudo yum install pcsc-tools
Source: http://symbolik.wordpress.com/2007/02/25/using-dod-cac-and-smartcard-readers-on-linux/
make a swap file on the fly
Published: 2013-10-16
Disclaimer: this should only be used if you can’t partition your drive by yourself, or it would be a hazzle to do so. I’ve used that method to make one compile process work, otherwise I don’t really need it.
Check for present swap space
if there’s any output you might consider another solutions
sudo swapon -sCreate the actual file
bs = times count equals filesize, in this case 1gb
sudo dd if=/dev/zero of=/swapfile bs=1024 count=1024kAlternative:
Create a linux swap area
sudo mkswap /swapfileOutput looks something like this:
Setting up swapspace version 1, size = 262140 KiB no label, UUID=103c4545-5fc5-47f3-a8b3-dfbdb64fd7eb
sudo swapon -sActivate the swap file
sudo swapon /swapfileNow `swapon -s` should show something like this
Filename Type Size Used Priority /swapfile file 262140 0 -1
Make it persistent in the /etc/fstab with the following entry
/swapfile none swap sw 0 0Make swappiness 0, otherwise performance will be poor. So it’s just an emergency buffer
echo 0 > /proc/sys/vm/swappinessmake swappiness persistent
echo 'vm.swappiness=0' > /etc/sysctl.confA bit of good practice, since this is root’s business
chown root:root /swapfile chmod 0600 /swapfile